Installation & Configuration of the PrestaShop Module
Follow the instructions below to install and setup the My Flying Box extension for Prestashop 1.7, Prestashop 8 or Prestashop 9.
Do you need assistance? We provide several types of workshops to help you setup the module for your specific needs.

General Overview
Le module couvre trois fonctions essentielles :
- Display shipping rates to your customers during checkout (front-end).
- Order and download shipping labels (back-office).
- synchronisation des commandes Prestashop et des expéditions (de manière bilatérale) entre votre boutique Prestashop et votre tableau de bord My Flying Box (à partir de la version 1.2.0 du module)
You can use these functions independently: for example, you can order My Flying Box labels in the back-office even if you have configured shipping options that are independent of the module.
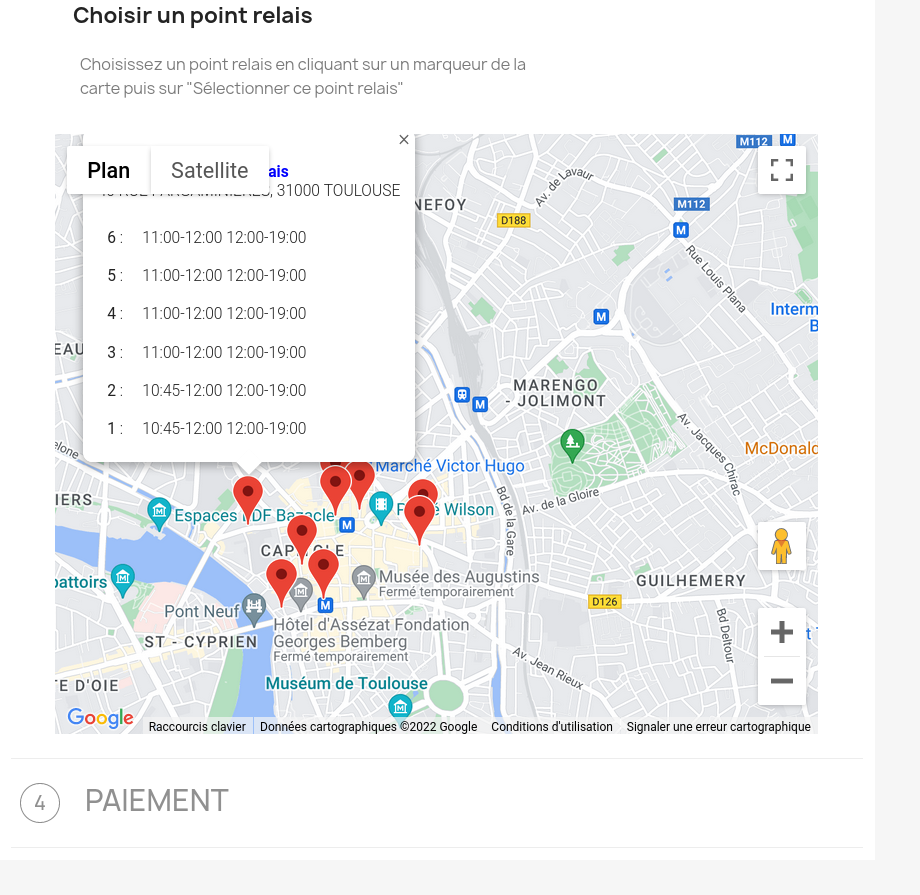
For the module to work properly, you need to have an active My Flying Box account with API access activated. If this is not yet the case, please contact our customer service. If you wish to display a map to allow the selection of a delivery location (for shop/relay delivery services), you must also have access to a Google API key supporting the following services: Maps Javascript API and Geocoding API.
For a visual and concrete presentation, you can watch the introduction video below. Alternatively, or additionally, scroll further down the page to read the detailed instructions for installation, configuration, and use of the module. Please note that this video has been recorded with Prestashop 1.7 and version 1.0.13 of the module; some options and interfaces may therefore differ from the current version. However, general principles remain fully applicable and most changes in the interface are minor.
Download and Install the Module
The module is not available on the official PrestaShop catalog. For installation, you will need to download the package corresponding to your version of PrestaShop and manually upload it via the module manager.
To download the latest version of the module, click on the button below, according to your version of PrestaShop:
For a history of released packages, please visit: https://github.com/myflyingbox/prestashop-lce/releases
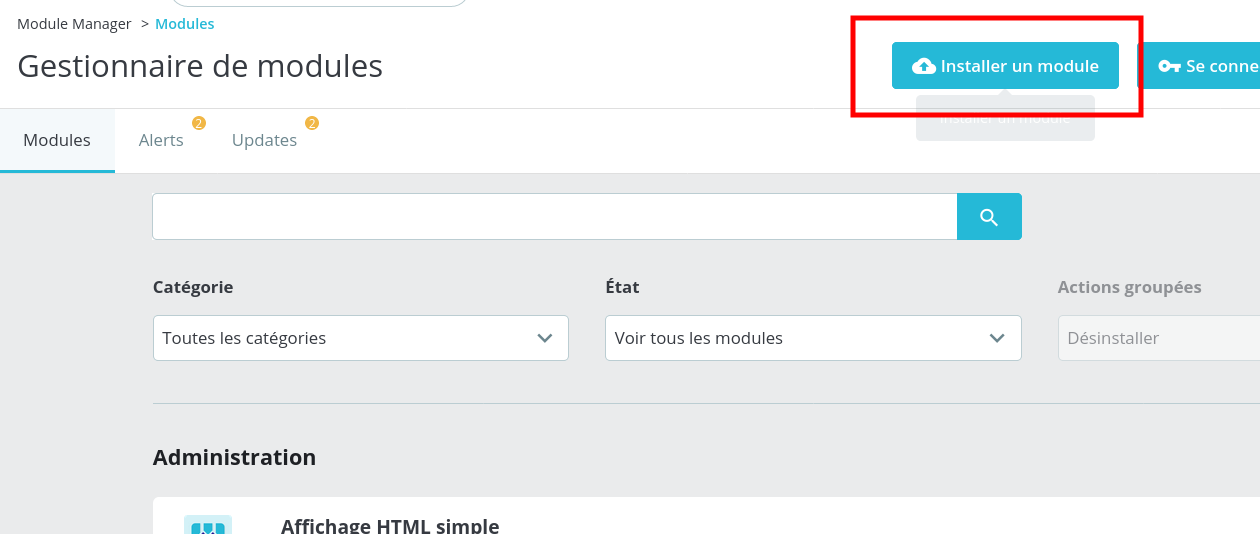
After downloading, open the module manager in your PrestaShop back-office and click on the "Install a module" button. Select the file you previously downloaded.
The module will install automatically.
Then click on the "Configure" button to proceed to the next step.
Configure General Settings
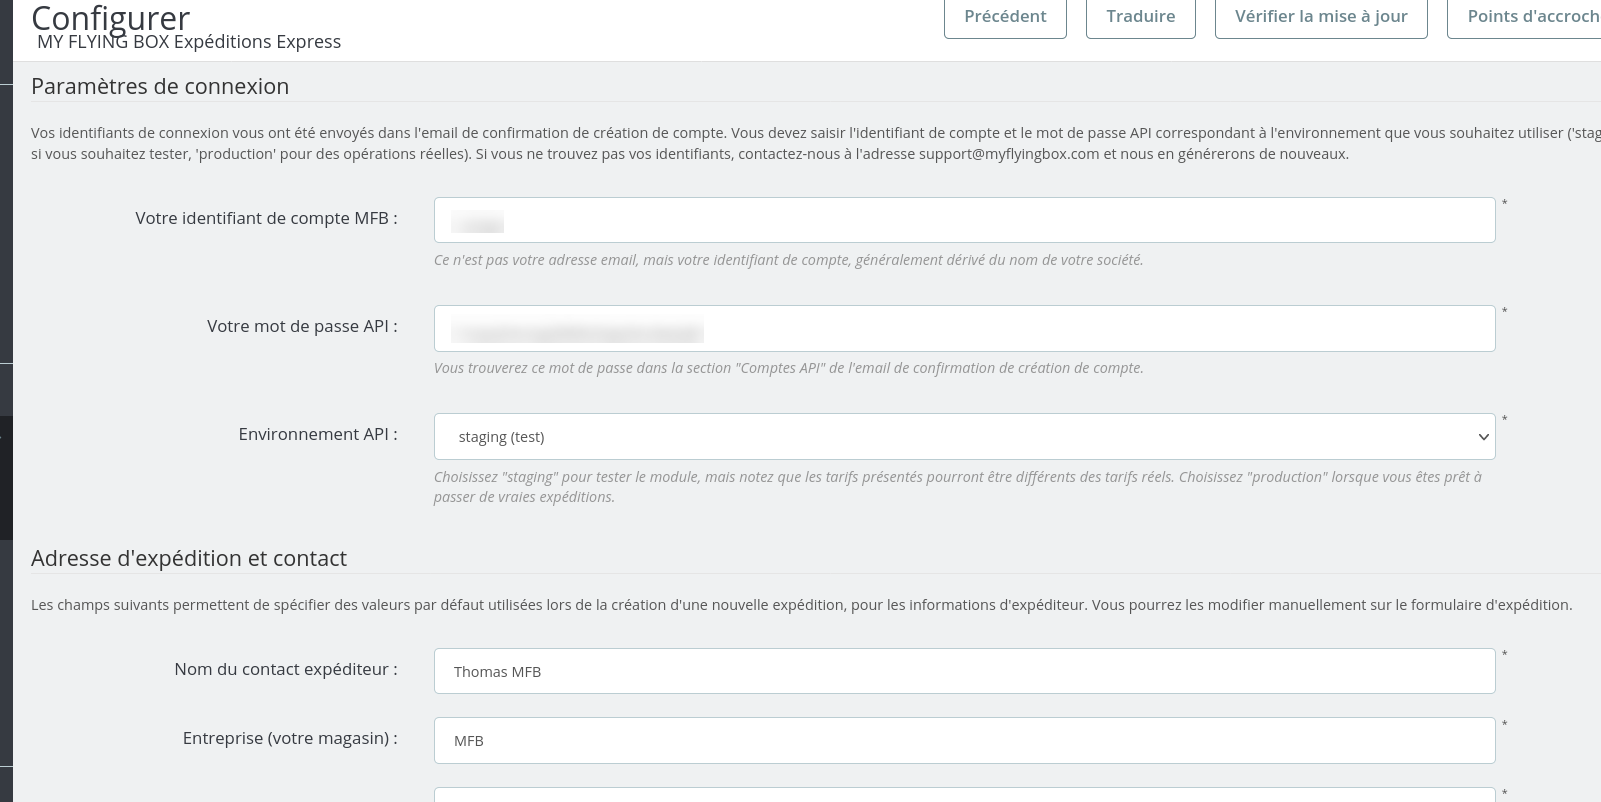
Click on the "Configure" button in the module manager to open the general configuration page. The form includes comprehensive explanations for each field, take the time to read them.
Firstly, you must enter your login details, which you can find on your My Flying Box client account (https://dashboard.myflyingbox.com/en/registrations/new) under Tools -> API -> "Accounts" tab.
Also, enter your default shipping address and then click on the "Save" button.
If the connection could not be established, an error message will display. Ensure the information entered and the selected environment are correct. If the environment you selected is not activated for your account, please contact our customer service.
If the connection has been established, continue with the configuration.
- Price Calculation Options
There are numerous strategies for calculating shipping costs. You may want a dynamic pricing that closely reflects reality, or you might prefer to present a flat rate or even include shipping costs in the price of your products.
To maintain maximum flexibility, the module uses standard "carriers" mechanisms native to PrestaShop. By default, a carrier associated with the My Flying Box module will use dynamic pricing, calculated by the module with a request to our web service to present an up-to-date rate. If you wish to use static pricing, you can simply use the native PrestaShop mechanisms on the carrier configuration page (see below).
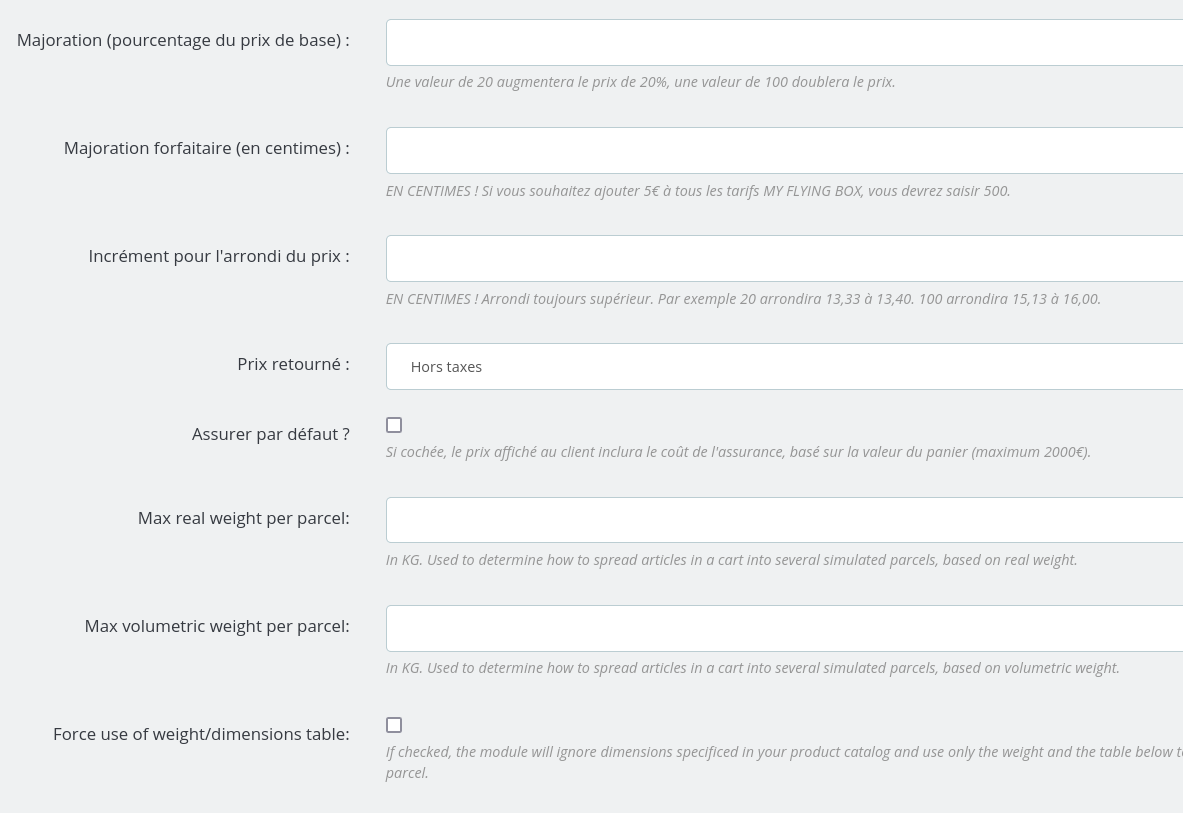
When you allow the module to dynamically determine the shipping rate based on the cart, you can finely control the calculation modalities.
Some options allow for the modification of the calculated price (percentage surcharge, absolute surcharge, rounding, optional insurance), while other options affect how the module attempts to determine virtual packaging for the considered cart (for any price calculation, we need precise packaging information).
Thus, you can indicate to the module that each virtual package must never exceed a certain weight (real or volumetric), which will force a multi-package calculation if the total cart weight exceeds the limit you have set.
The option "Force the use of the weight/dimensions correlation table" compels the module to ignore the dimensions of the items in the cart, and to use only the weight of the items to calculate the dimensions of the packages, based on a weight/dimensions correlation defined by yourself.
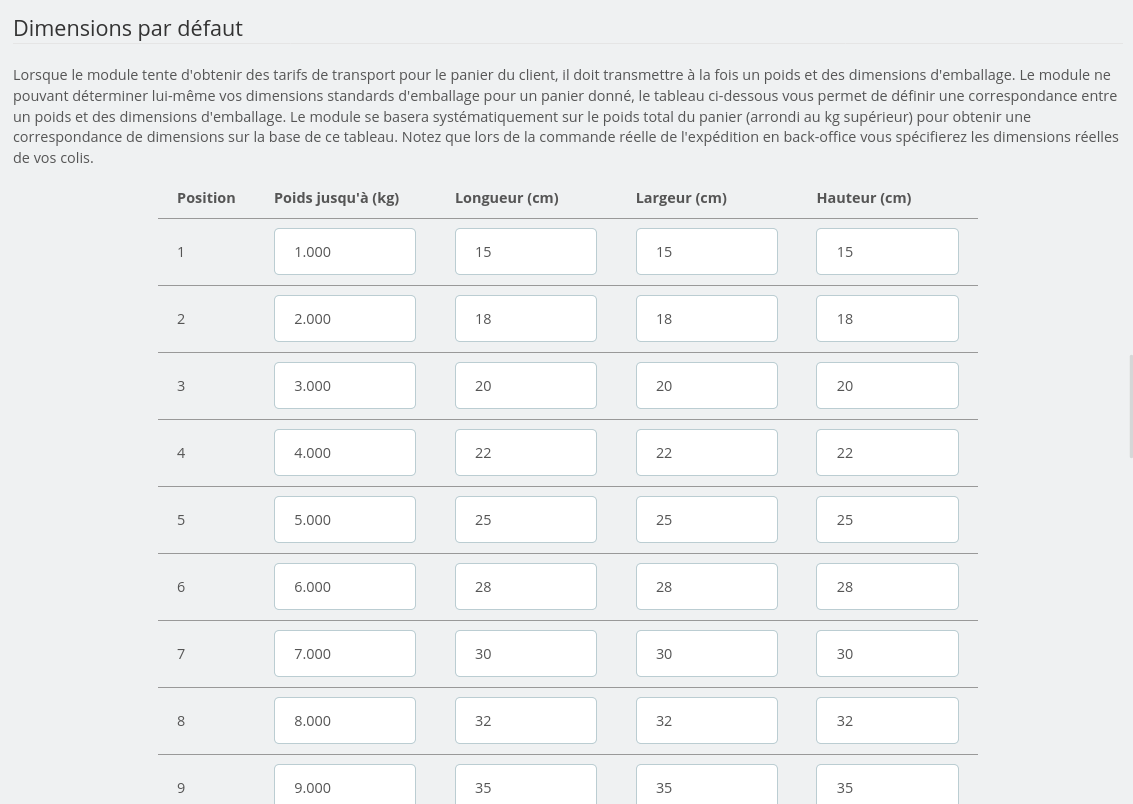
- Default Dimensions
The weight/dimensions correlation table allows you to specify a correlation between a weight range and a package size. For example, if you sell wine bottles in 3 standard packaging (1 bottle, 3 bottles, 6 bottles), you can populate this table based on three weight limits: up to 2kg (1 bottle + packaging weight), up to 5kg (3 bottles + packaging weight), up to 10kg (weight of 6 bottles + packaging weight).
Note that if your product catalog includes the dimensions of products in addition to their weight, the module initially attempts to simulate a virtual package by stacking the products flat, unless you check the option "Force the use of the weight/dimensions correlation table."
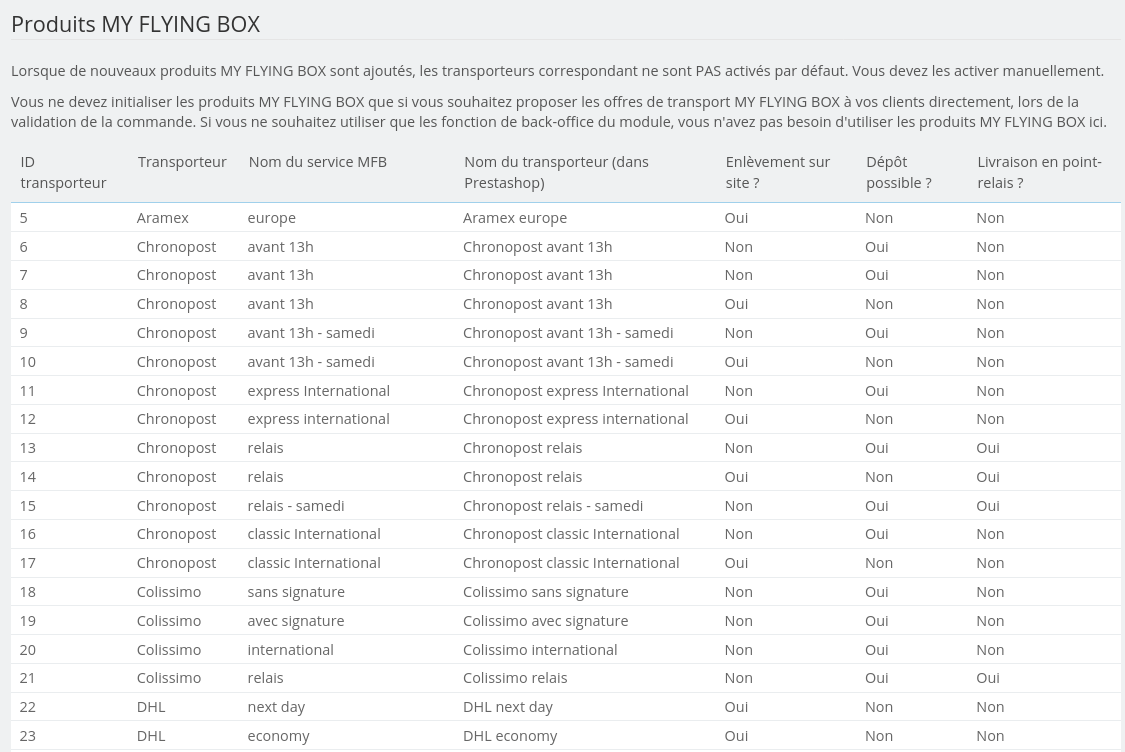
- List of Shipping Services
Under the heading "List of Products" on the configuration page, you will find the list of shipping services initialized by the module. This list is automatically synchronized from our web service when the connection between the module and your My Flying Box account is established.
You can force a manual synchronization if you notice that some services are presented via our web interface and are not present on the module.
For each service, the module creates a PrestaShop carrier. Thus, when you open the PrestaShop configuration page "Shipping" -> "Carriers", you will find the carriers initialized by the module.
Configure Carriers
When the connection to our web service is properly established, the module initializes a list of carriers in PrestaShop, each carrier corresponding to a transport service supported by My Flying Box.
By default, carriers are disabled. You can choose which carriers to offer to your clients and activate them on demand.
Some carriers may have the same name, as they correspond to the same service but with different options (on-site pickup or drop-off, relay delivery, etc.). These characteristics are visible on the list of services presented at the bottom of the module's configuration page, along with the PrestaShop carrier ID. To determine the right carrier to activate, start by identifying the service that interests you on the module's configuration page, then note the carrier ID; use this ID to identify the correct carrier in the list of carriers on the Shipping -> Carriers page.
- Dynamic Pricing
Without further configuration on your part, activated carriers will operate in dynamic mode: the module will try to build a virtual package based on the cart content, either taking into account the dimensions of the products or using the weight/dimensions correlation table, then send a rate request to our web service. The advantage of this approach is to have up-to-date pricing with very little configuration, reflecting the characteristics of the order as closely as possible.
Please note: to obtain a rate, the destination address (postal code, city, country) must be known. Thus, carriers configured in dynamic mode cannot be used for a shipping cost estimate until the customer has specified precise information for the delivery address.
Finally, this approach is not recommended if you have an extremely heterogeneous product catalog (if you sell both small heavy products and large but lightweight items), especially if the dimensions of the products are not listed in the catalog.
- Static Pricing
If you wish to precisely control the rate offered to your clients, you can use the standard mechanisms of PrestaShop to determine a statically defined price grid.
When at least one static rule is defined for a transport linked to the My Flying Box module, the module deactivates dynamic mechanisms and returns the rate generated by the native PrestaShop mechanisms.
Testing Rate Calculation
When you have completed the configuration, the best way to test the operation of the rate rules is to switch the module to the 'production' environment (be sure to specify the correct password) and make an order simulation.
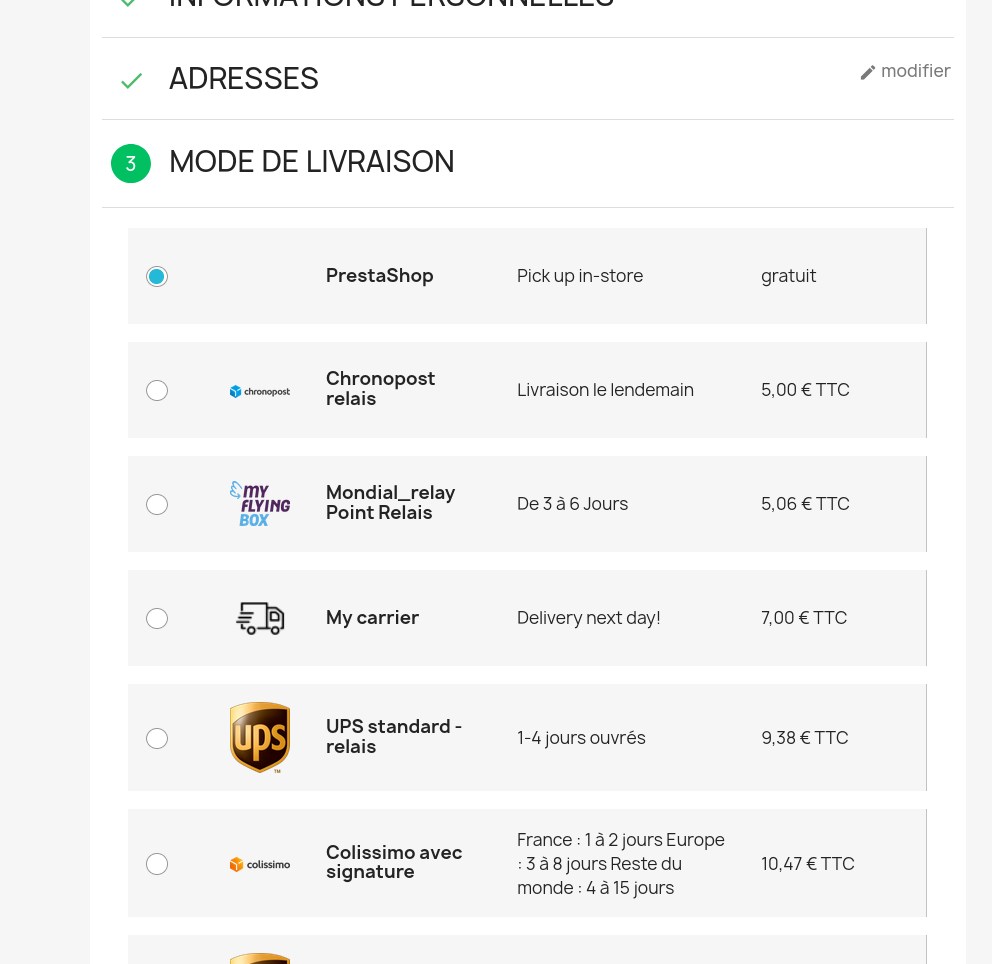
If all goes well, when choosing the delivery options, you should see the carriers that you have configured and activated.
- Web Dashboard Analysis
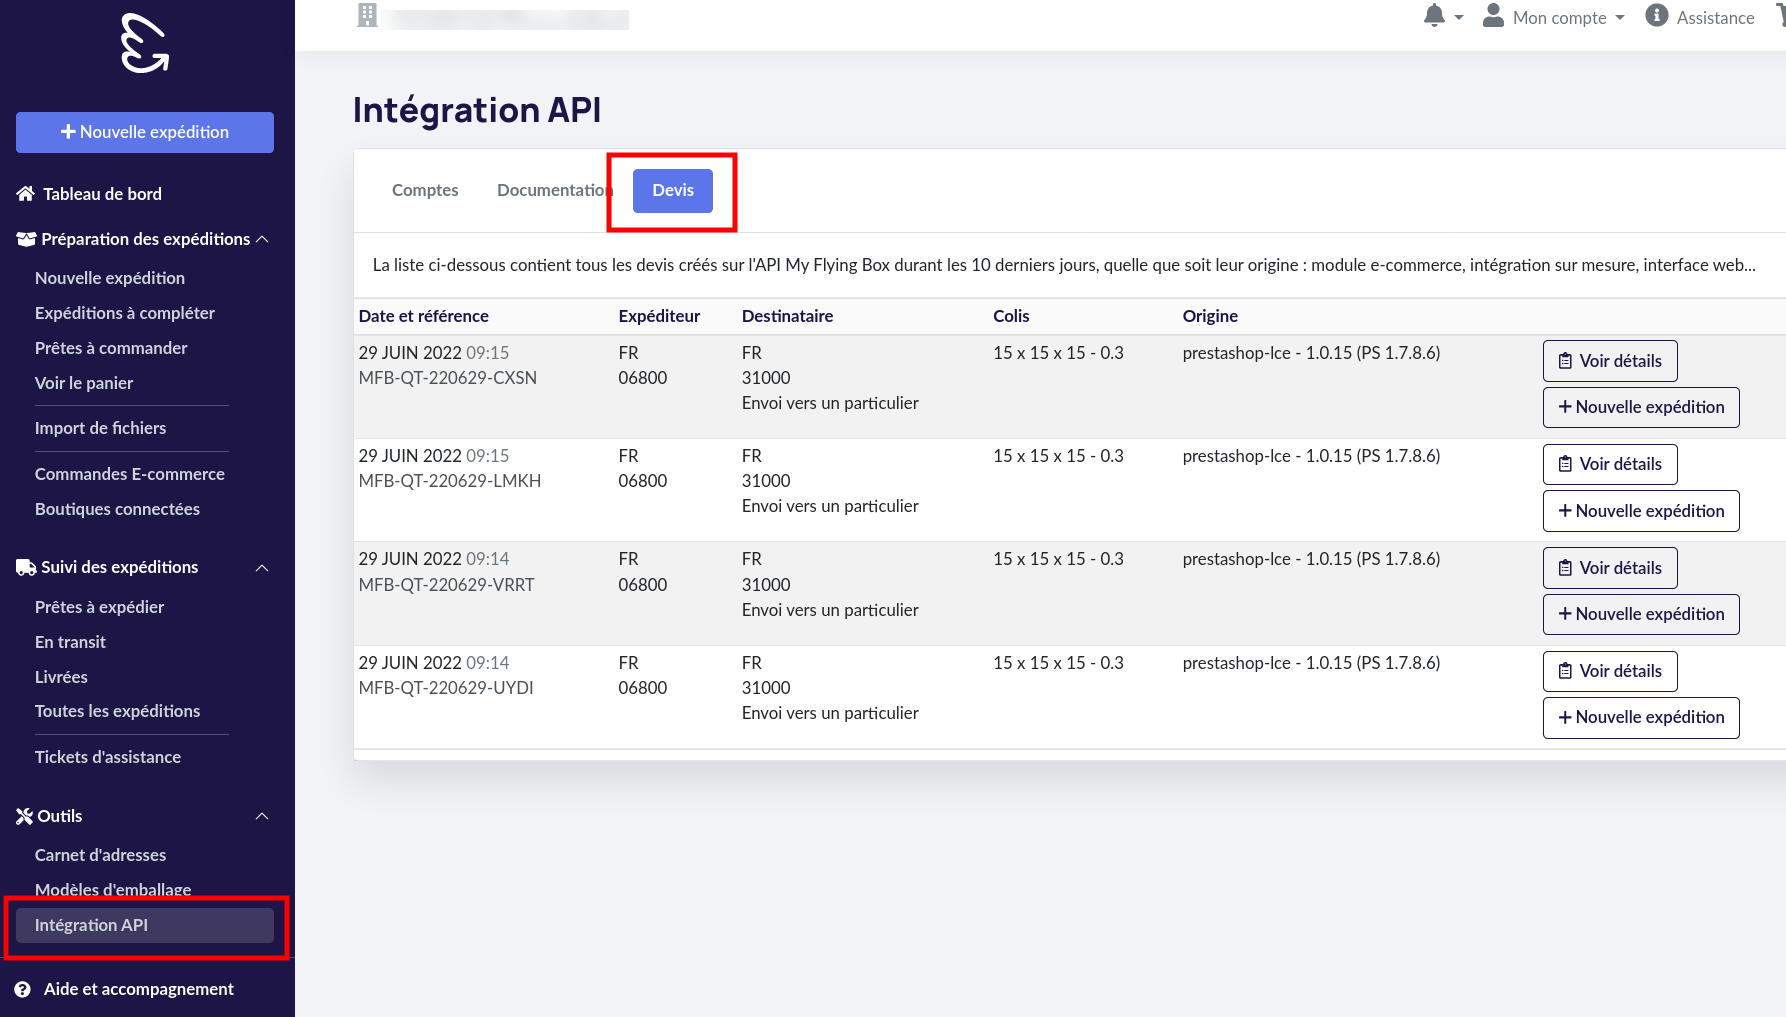
When the module is configured with the production environment, the rate requests sent to the web service are viewable via the web interface of your client account (https://dashboard.myflyingbox.com/en/registrations/new) under Tools -> API -> "Quotes" tab.
During your order tests, you can thus analyze in real time the requests sent by the module. By observing the dimensions of the virtual packaging determined by the module as well as the list of returned services and their prices, you can identify any configuration issues and make informed adjustments to achieve the desired result.
- Troubleshooting Strategies
In case of a problem, you should work by elimination. First, make sure that you have activated the correct carriers. Then, ensure that the module is communicating properly with the web service by re-registering the connection settings (an error message will be displayed in case of a connection issue).
If the communication is functioning, next check that the module is indeed sending rate requests, by configuring the production environment and consulting the list of quotes via the interface described above (Tools -> API -> Quotes).
If the issue concerns the display of the relay point selector, the cause is probably more technical and will require analysis via the JavaScript console. Interactions with other modules may trigger this type of error.
If you are stuck and cannot resolve the issue you are encountering, do not hesitate to contact our technical team at tech@myflyingbox.com
Ordering Shipping Labels
The My Flying Box module for PrestaShop allows you to order your shipping labels without leaving the back-office of your online storefront.
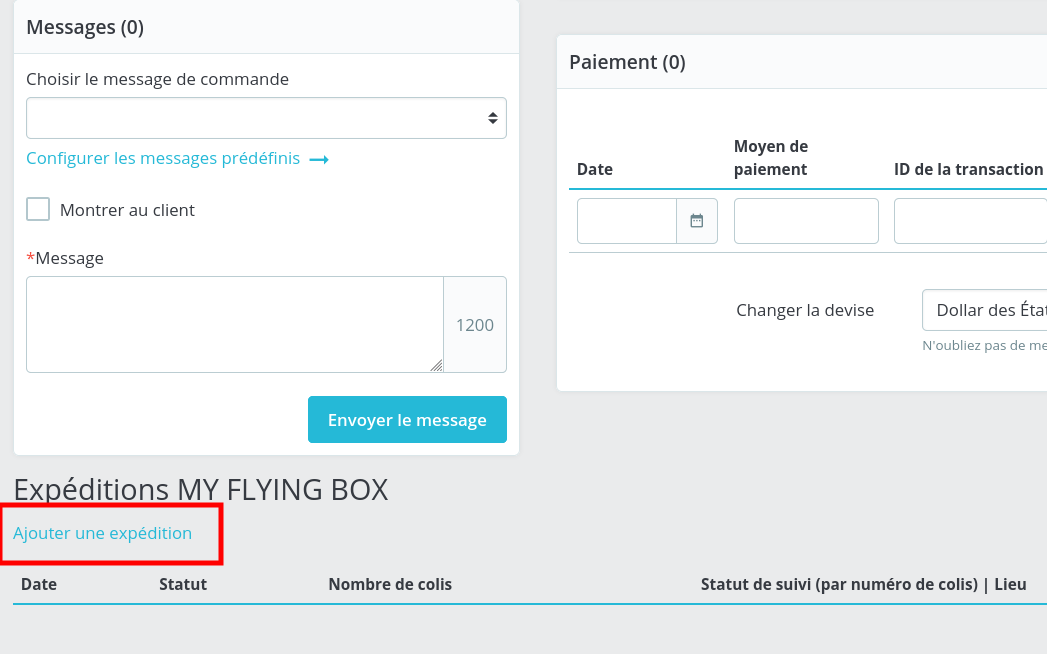
- Registering a Shipment
The first step in generating a label is to initialize a My Flying Box shipment: open the order you wish to ship, then look for the "MY FLYING BOX Shipments" section. Click on the "Add a shipment" link.
A new draft status shipment will be created. The data is pre-filled according to the following mechanisms:
- delivery address: address provided by the client during the order
- shipping address: address entered in the module configuration options
- packaging: the rules defined in the module options are used (weight/dimensions correlation table, maximum weight per package) to determine the distribution of items in virtual packages; the value of each package is calculated based on the distribution determined by the module; the merchandise description corresponds to the value entered in the module options.
- insurance: checked automatically if you have activated this option in the configuration of the module.
As long as you have not generated a label, you can modify all the data of the shipment, to ensure that they correspond accurately to reality. Be particularly attentive to the packaging (weight and dimensions), as a discrepancy with reality may result in an initial overcharge, a subsequent re-billing, or blockages with the carrier.
Any modification of the shipment data triggers a new calculation of transport rates. This operation can take a few seconds.
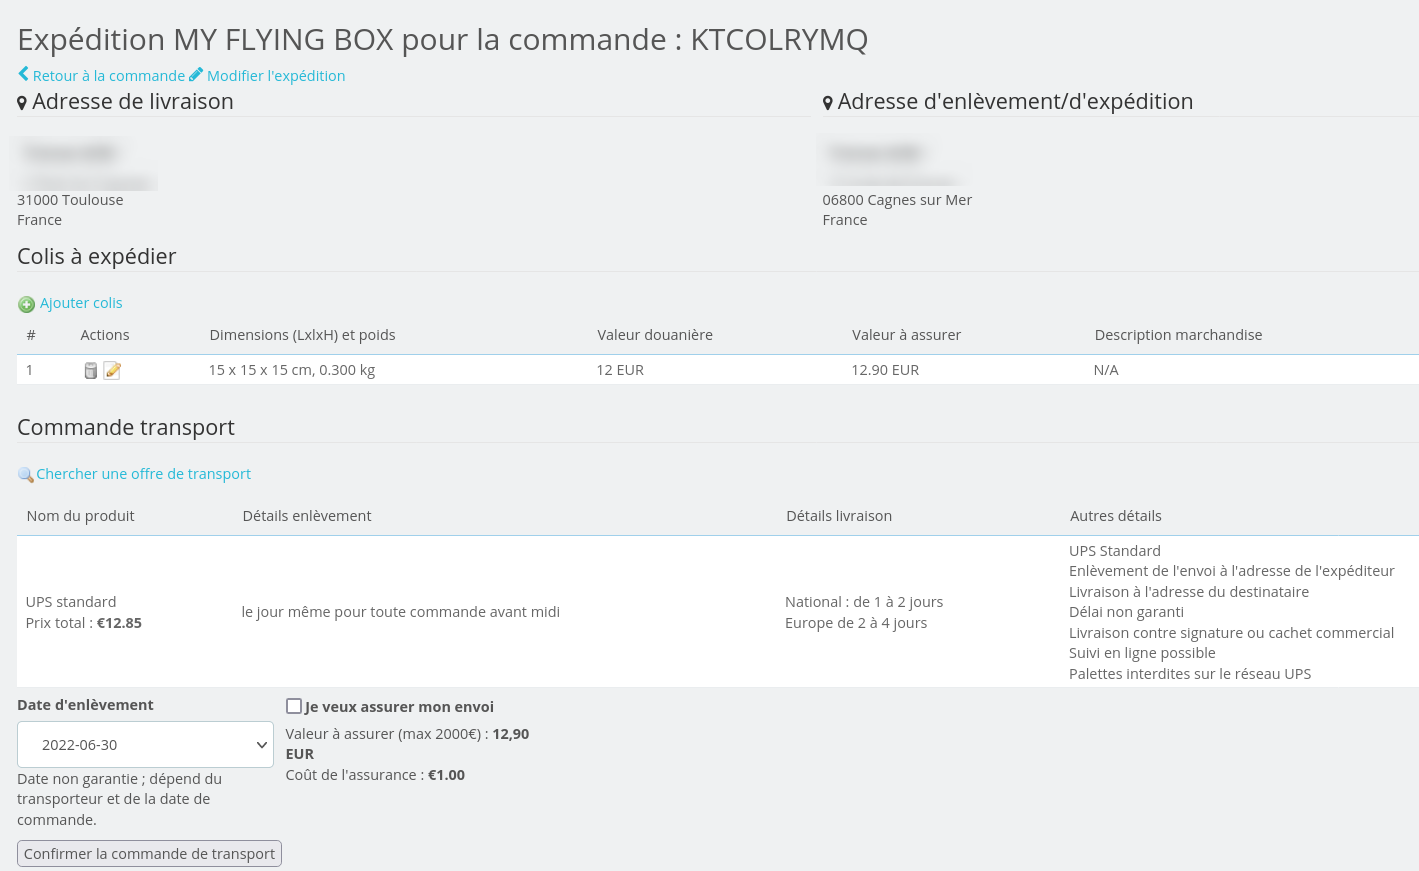
- Selecting a Transport Service
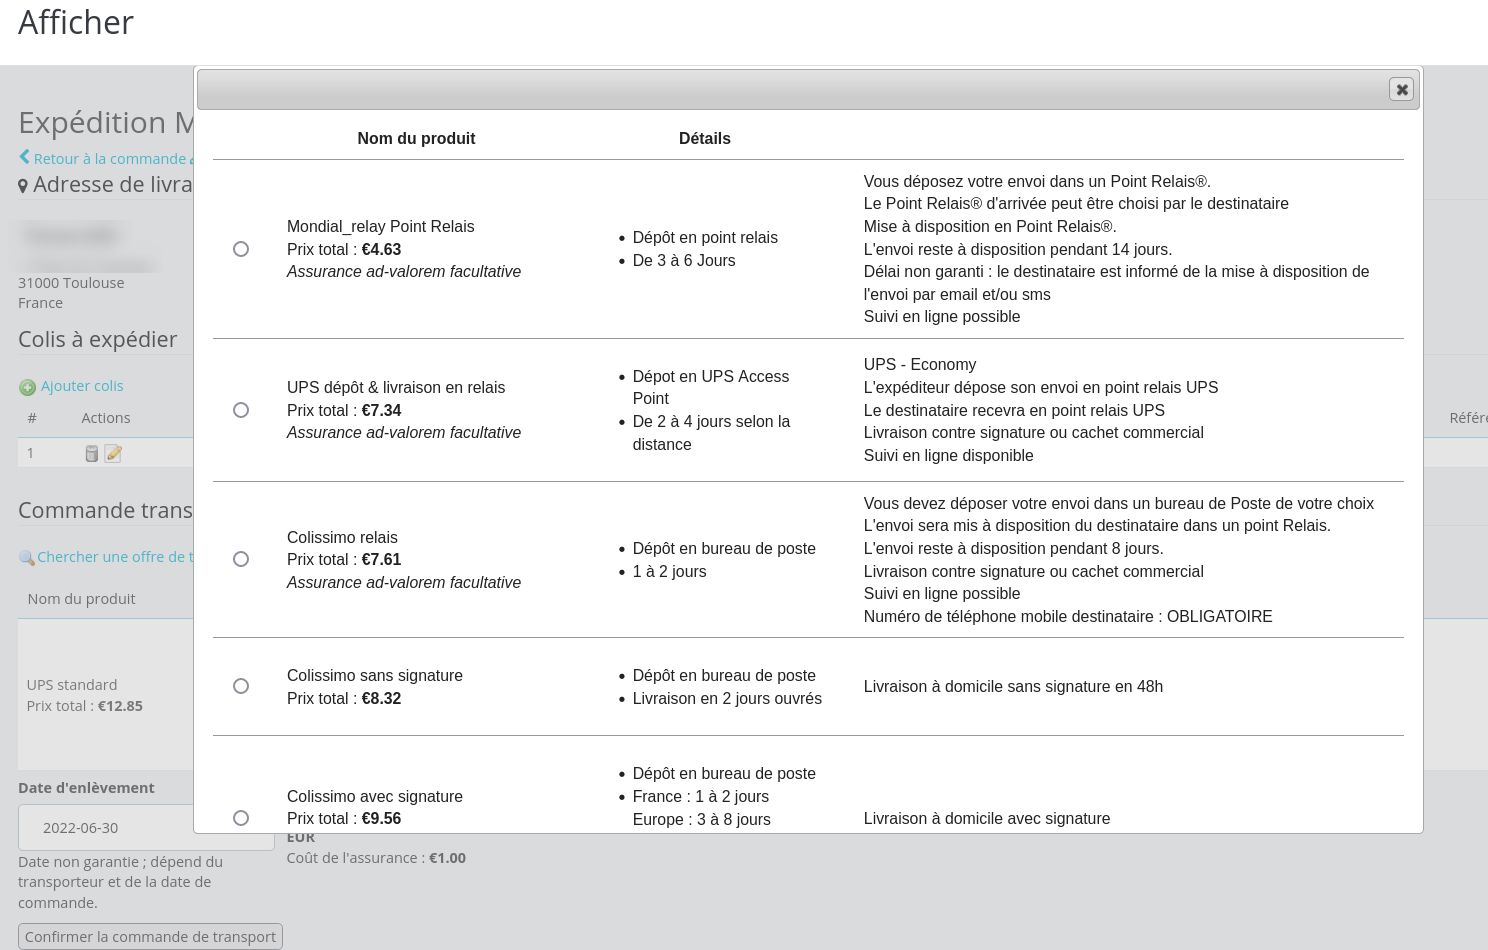
If the client had chosen a carrier linked to the module, the corresponding service will be automatically selected. However, you still have access to all services available for this shipment. By clicking on the 'search for a transport offer' link, you have access to the complete list and can thus select another service.
If no service is presented, the most probable causes are:
- incorrect data at the level of the shipment (re-check the departure and destination addresses, ensure that all packaging data is entered and consistent)
- a problem with the module's communication with our web service (check your identifiers, check the status of your account via our web interface at https://dashboard.myflyingbox.com/en/registrations/new).
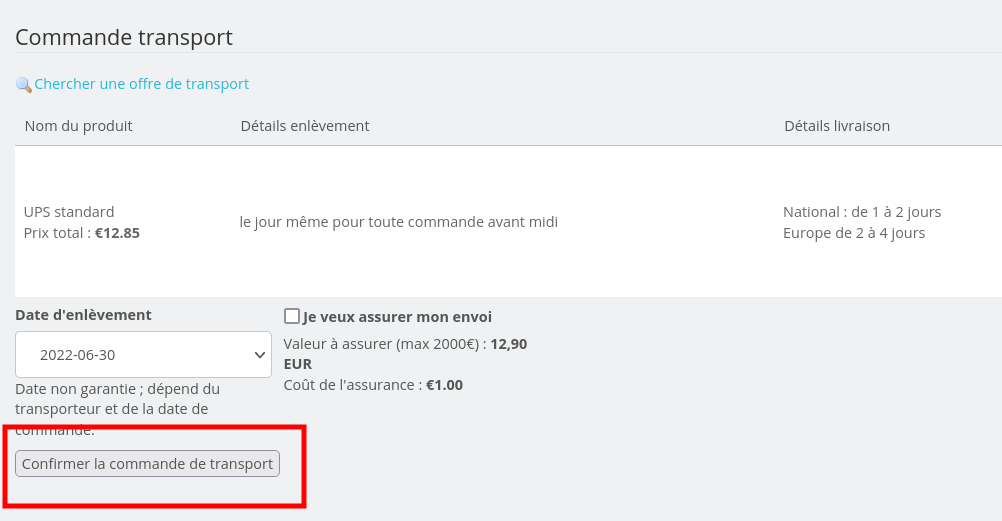
Depending on the selected service, various additional options will be displayed: pick-up date, relay point for delivery, insurance.
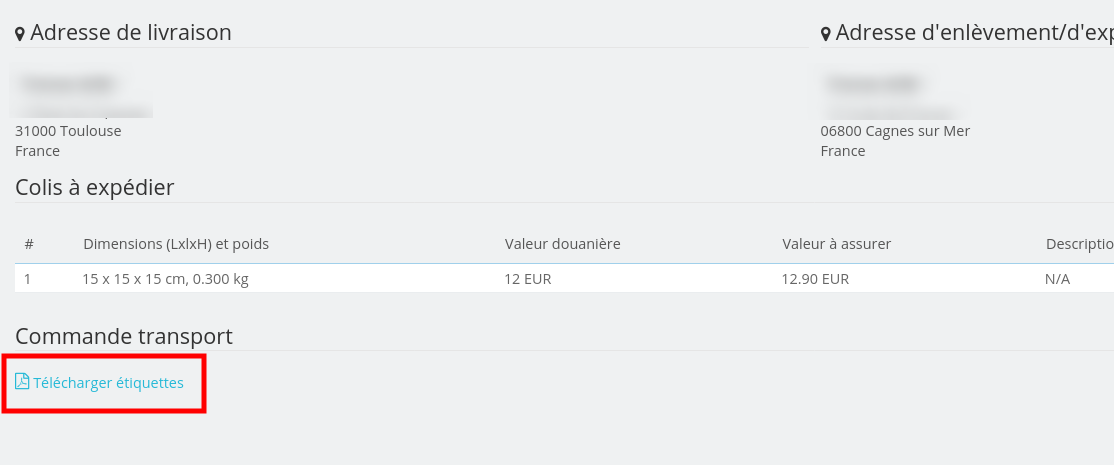
- Order and Download the Shipping Label
When all the data is correct and you have chosen your transport service and specified the associated options, click on "Confirm the transport order" to validate the order.
In case of an error, a message will be displayed. The main causes of error are an incorrect or problematic address (special characters, lines too long, etc.) or insufficient credit on your account. If you do not understand the error returned by the module, do not hesitate to contact our customer service.
Once the order is validated, click on "Download labels" to download the label(s) in PDF format.
Your shipment is also viewable on your client account via our web interface, from which you can also track and open incident tickets as necessary.
If you have checked the "Update order status" option in the module configuration, the order will automatically switch to "In progress" status, triggering the sending of a notification email to the client (a native mechanism of PrestaShop, not specific to the module).
Configurer la synchronisation des commandes
Cette fonctionnalité n’est disponible qu’à partir de la version 1.2.0 du module.
Ces options permettent d’activer et de contrôler la synchronisation des commandes de votre boutique Prestashop vers le tableau de bord My Flying Box, afin de générer les bordereaux depuis le tableau de bord et non depuis le back-office Prestashop, bénéficiant ainsi de l’ensemble des fonctionnalités proposées par nos outils. Par exemple la douane électronique n’est disponible que via notre tunnel de commande dans le tableau de bord, et non dans le back-office de notre module Prestashop.
Pour accéder aux options de configuration, cliquez sur le bouton « Configurer » dans le gestionnaire de module pour ouvrir la page de configuration générale du module.
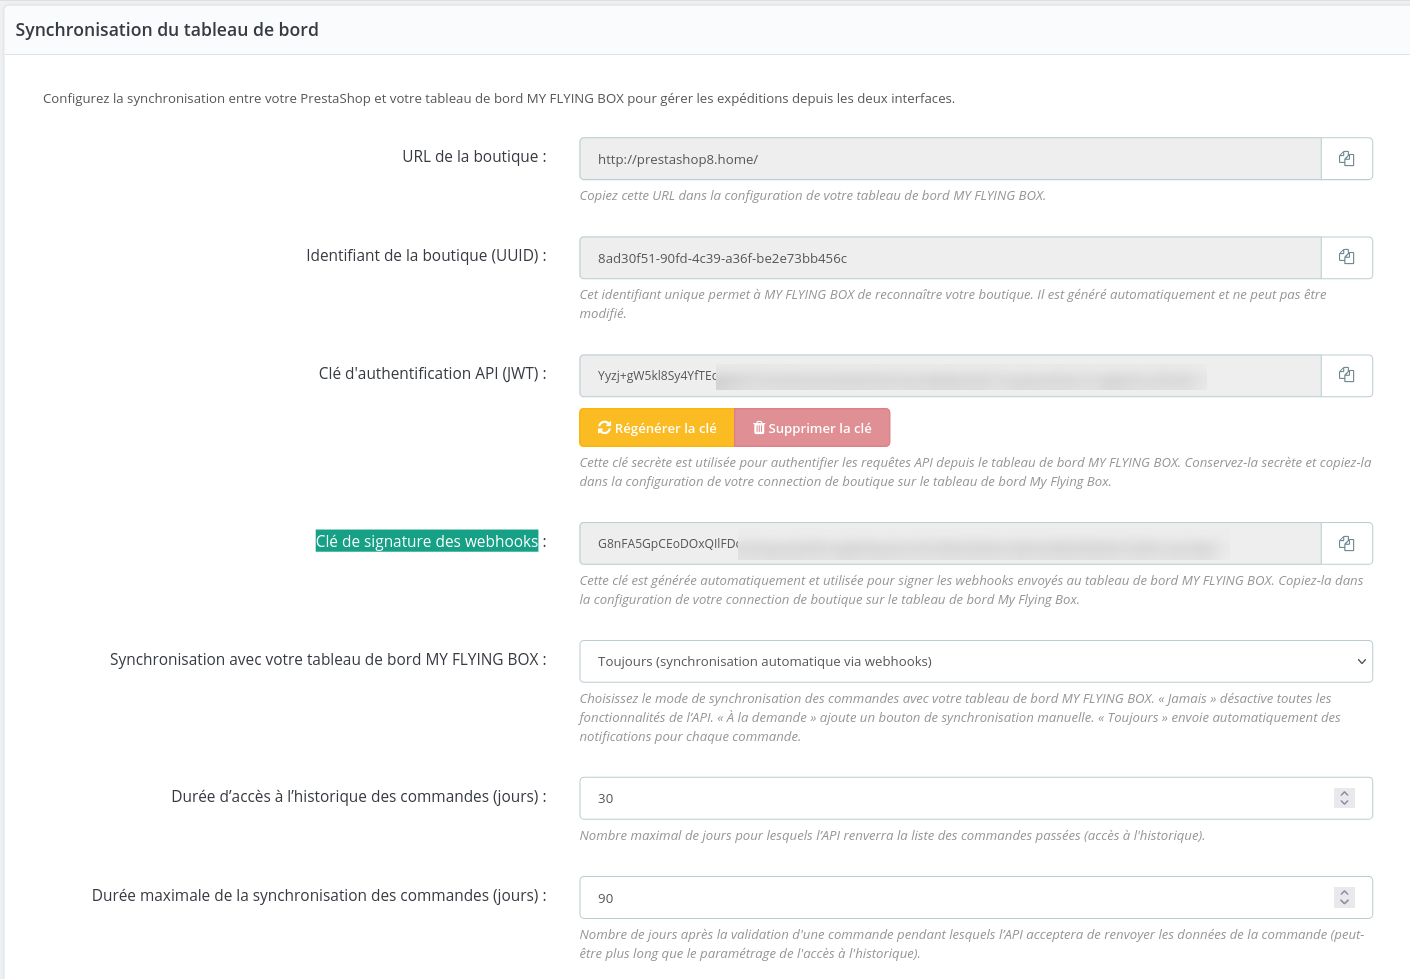
Descendez jusqu’à la section « Synchronisation du tableau de bord ».
Pour activer la synchronisation, vous devez d’abord cliquer sur « Générer une clé » au niveau de l’option « Clé d’authentification API (JWT) », puis sélectionner un mode de synchronisation (option « Synchronisation avec votre tableau de bord MY FLYING BOX »), parmi les trois modes suivants :
– Jamais (par défaut) : la synchronisation est totalement désactivée.
– A la demande : c’est vous qui déclenchez manuellement la synchronisation d’une commande via un bouton dédié sur le back-office Prestashop. Recommandée si vous n’avez que des besoins ponctuels (par exemple pour bénéficier de la douane électronique dans le cas d’un export).
– Toujours : chaque nouvelle commande est synchronisée automatiquement avec votre tableau de bord My Flying Box, sans action manuelle de votre part. Recommandé si vous préférez utiliser systématiquement les outils du tableau de bord pour suivre et générer vos bordereaux de transport.
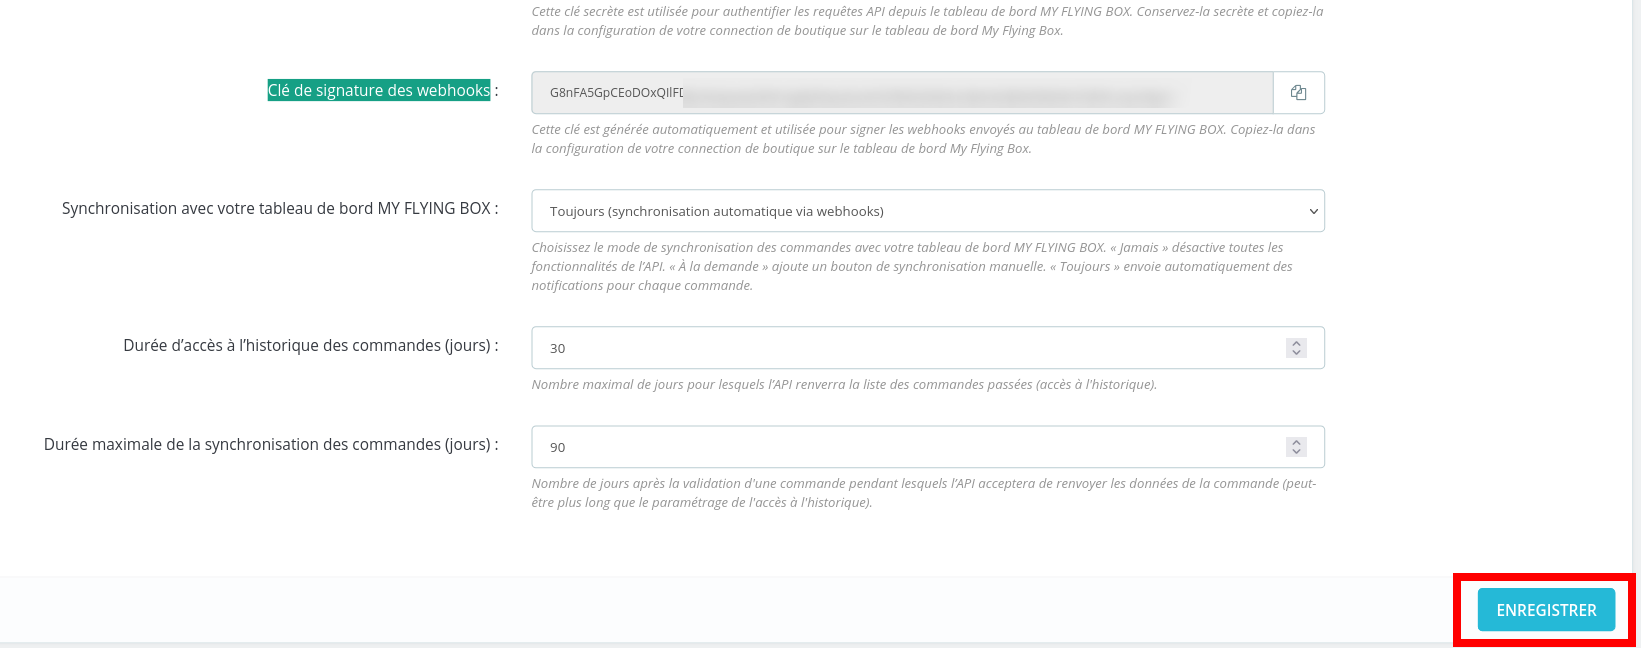
Configurez le cas échéant les options de contrôle de durée d’accès aux commandes via l’API de synchronisation. Il s’agit de mécanismes de sécurité pour limiter l’exposition des commandes.
Cliquez ensuite sur le bouton « Enregistrer » pour appliquer les changements.
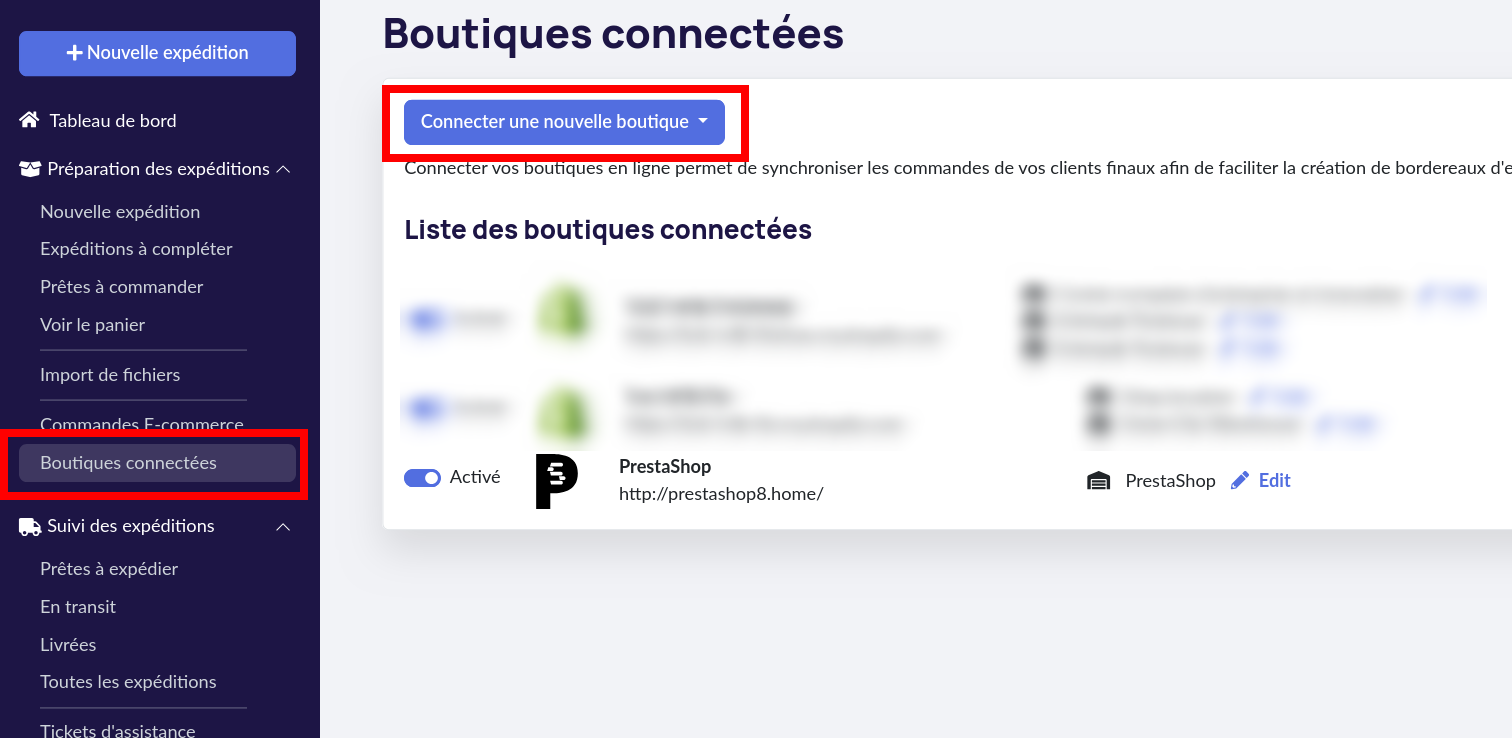
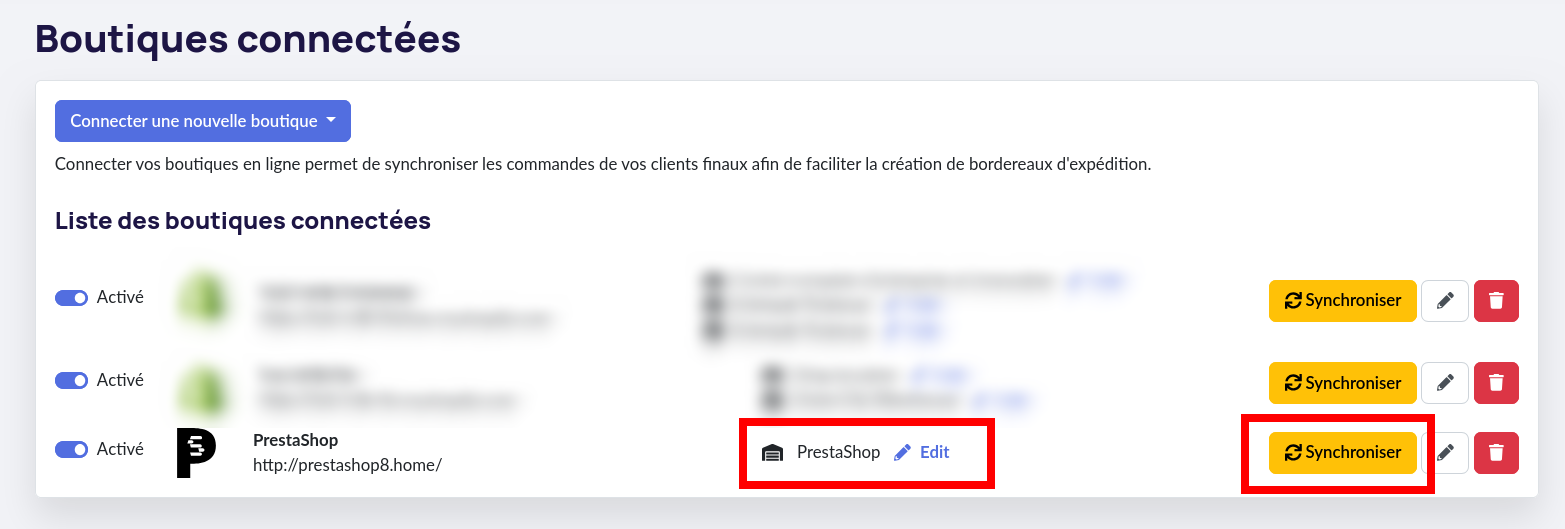
Dans un nouvel onglet, ouvrez votre tableau de bord My Flying Box (https://dashboard.myflyingbox.com/en/registrations/new) puis naviguez dans la section « Boutiques connectées ».
Cliquez sur le bouton « Connecter une nouvelle boutique » puis sélectionnez Prestashop.
Dans le formulaire, copier/coller dans les quatre champs les valeurs correspondantes à partir de la page de configuration du module sur votre boutique Prestashop :
– URL de la boutique
– Identifiant de la boutique
– Clé d’authentification API (JWT)
– Clé de signature des webhooks
Cliquez sur le bouton « Enregistrer la connexion Prestashop ».
Une fois la boutique connectée, vous pouvez cliquer sur le bouton « Synchroniser » à droite de la boutique (sur la page « Boutiques connectées »), pour déclencher la synchronisation des commandes existantes (dans la limite de la période définie dans la configuration du module Prestashop, voir plus haut).
Vous trouverez vos commandes synchronisées sur la page « Commandes E-commerce », accessible depuis le menu latéral.
Après avoir synchronisé au moins une commande, un lieu de stockage aura été automatiquement créé en lien avec votre boutique (Prestashop ne gérant pas nativement des lieux de stockage multiples, il s’agit d’un lieu ‘virtuel’ initialisé par défaut). Les informations spécifiées sur ce lieu sont utilisées pour charger automatiquement les informations d’expéditeur lorsque vous créez une expédition à partir d’une commande Prestashop. Il est donc vivement recommandé d’aller vérifier et compléter les informations, en cliquant sur le lien de modification à côté du lieu de stockage.

Si vous souhaitez désactiver la synchronisation, supprimez la connexion côté tableau de bord My Flying Box (cela supprimera également les commandes déjà synchronisées mais votre historique d’expéditions restera intact) puis modifier la configuration du module Prestashop pour passer le mode de synchronisation à « Jamais ».
Need assistance?
Our team is available to provide you with help.